What Is The Diaphragm On A Microscope
Kalali
Mar 17, 2025 · 6 min read
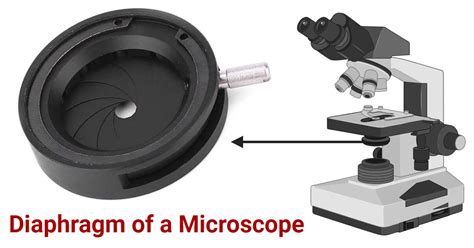
Table of Contents
- What Is The Diaphragm On A Microscope
- Table of Contents
- What is the Diaphragm on a Microscope? A Comprehensive Guide
- What is a Microscope Diaphragm?
- Types of Microscope Diaphragms
- 1. Iris Diaphragm: The Most Common Type
- 2. Disc Diaphragm: A Simpler Alternative
- 3. Field Diaphragm: Focusing the Light
- The Importance of Diaphragm Adjustment
- How to Adjust the Diaphragm for Optimal Results
- 1. Achieving Köhler Illumination: The Foundation of Good Microscopy
- 2. Magnification and Diaphragm Setting
- 3. Specimen Type and Diaphragm Setting
- 4. Observing Different Optical Effects
- Troubleshooting Common Diaphragm-Related Issues
- 1. Image too Dark
- 2. Image too Bright
- 3. Poor Contrast
- 4. Poor Resolution
- Conclusion: Mastering the Art of Diaphragm Adjustment
- Latest Posts
- Latest Posts
- Related Post
What is the Diaphragm on a Microscope? A Comprehensive Guide
The microscope diaphragm, often overlooked, plays a crucial role in achieving high-quality microscopic images. Understanding its function and how to properly adjust it is essential for any serious microscopy user, from students to seasoned researchers. This comprehensive guide will delve into the intricacies of the microscope diaphragm, explaining its purpose, different types, and optimal usage techniques for various applications.
What is a Microscope Diaphragm?
The microscope diaphragm is a device located within the condenser, a component situated beneath the stage of a microscope. Its primary function is to control the amount of light that reaches the specimen. This is achieved by adjusting the size of the aperture, which is the opening through which light passes. By regulating the light intensity and its distribution, the diaphragm significantly impacts the image's contrast, resolution, and overall quality.
Types of Microscope Diaphragms
Several types of diaphragms are used in microscopes, each with unique characteristics and applications:
1. Iris Diaphragm: The Most Common Type
The iris diaphragm is the most prevalent type found in most modern microscopes. It's named for its resemblance to the iris of an eye, consisting of a series of overlapping metallic leaves that can be adjusted to open or close the aperture. This allows for precise control over the light intensity and the angle of light reaching the specimen. The iris diaphragm offers the greatest versatility in light management.
2. Disc Diaphragm: A Simpler Alternative
The disc diaphragm, a simpler mechanism, utilizes a rotating disc with several apertures of varying sizes. Each aperture offers a predetermined level of light intensity. By rotating the disc, you select the desired aperture size. While simpler than the iris diaphragm, it offers less precise control over the light intensity.
3. Field Diaphragm: Focusing the Light
While not directly part of the condenser diaphragm, the field diaphragm is critically important. Located at the base of the condenser, it controls the illumination field diameter and is adjusted separately from the condenser aperture diaphragm. Properly adjusting the field diaphragm is essential for achieving Köhler illumination, a critical technique for obtaining optimal image quality.
The Importance of Diaphragm Adjustment
Proper diaphragm adjustment is paramount for optimal microscopy. Incorrect adjustment can lead to several issues:
- Reduced Resolution: Insufficient light can result in a blurry image with poor resolution.
- Low Contrast: Too much light can wash out details, diminishing the contrast between structures in the specimen.
- Poor Depth of Field: Improper adjustment can negatively affect the depth of field, making it difficult to focus on different layers within the specimen.
- Artifacts: Incorrect light levels might introduce artifacts into the image, making accurate interpretation challenging.
How to Adjust the Diaphragm for Optimal Results
The optimal diaphragm setting depends on several factors, including the type of microscope, the specimen being observed, and the magnification level. However, there are general guidelines:
1. Achieving Köhler Illumination: The Foundation of Good Microscopy
Köhler illumination is a crucial technique that ensures even illumination across the entire field of view. It involves adjusting both the field diaphragm and the condenser aperture diaphragm to achieve optimal lighting conditions. The steps typically involve:
- Focus on the specimen: Begin by focusing the microscope on the specimen at the desired magnification.
- Adjust the field diaphragm: Close the field diaphragm until it is partially visible in the field of view.
- Center the field diaphragm: Use the condenser centering screws to precisely center the partially visible field diaphragm.
- Open the field diaphragm: Open the field diaphragm until the illuminated field fills the entire field of view.
- Adjust the condenser aperture diaphragm: Close the condenser aperture diaphragm until the image exhibits optimal contrast and resolution. This is usually achieved by gradually closing the diaphragm until slight diffraction is visible around the edges of the specimen. Excessive closure will lead to a loss of resolution.
2. Magnification and Diaphragm Setting
As magnification increases, the resolution requirements generally increase. This usually requires that the condenser aperture diaphragm be opened slightly more to maintain adequate resolution, yet contrast often needs to be carefully balanced. The balance needs to be finely tuned for every new specimen and magnification.
3. Specimen Type and Diaphragm Setting
The type of specimen also influences diaphragm adjustment. Highly transparent specimens may require more open settings, while densely stained specimens might require slightly more closed settings to improve contrast.
4. Observing Different Optical Effects
Manipulating the condenser aperture diaphragm can showcase different optical effects. For instance:
- High contrast and resolution: Slightly closing the diaphragm can improve contrast and potentially resolution.
- Depth of field adjustment: By closing the diaphragm, depth of field can sometimes be improved, making it easier to focus on different planes within the specimen.
- Diffraction patterns: Closing the diaphragm might introduce visible diffraction patterns, which can be useful in some specialized applications.
Troubleshooting Common Diaphragm-Related Issues
Addressing common issues related to diaphragm adjustment can significantly enhance your microscopy experience.
1. Image too Dark
If your image is too dark, try:
- Opening the condenser aperture diaphragm: This will allow more light to reach the specimen.
- Adjusting the light source intensity: Increase the intensity of the light source.
- Checking the light path: Ensure there are no obstructions in the light path.
2. Image too Bright
If your image is too bright, try:
- Closing the condenser aperture diaphragm: This will reduce the amount of light reaching the specimen.
- Lowering the light source intensity: Decrease the intensity of the light source.
3. Poor Contrast
If the contrast is poor, try:
- Adjusting the condenser aperture diaphragm: Fine-tuning this can significantly enhance contrast.
- Using different staining techniques: Proper staining techniques can significantly enhance contrast in biological samples.
4. Poor Resolution
If the resolution is poor, try:
- Opening the condenser aperture diaphragm slightly: However, be mindful not to open it too much. Excessive opening will negate the improvements in resolution.
- Checking the objective lens: Ensure that the objective lens is clean and properly aligned.
- Checking for other optical issues: Consider any possible problems with the condenser or microscope's optical path.
Conclusion: Mastering the Art of Diaphragm Adjustment
The microscope diaphragm is a fundamental component that significantly impacts the quality of microscopic images. Understanding its functionality, the different types available, and proper adjustment techniques are crucial for any microscopy user. By mastering the art of diaphragm adjustment, you can obtain high-quality, high-resolution images with excellent contrast, enabling accurate observation and analysis of your specimens. Remember, practice and patience are key to perfecting your diaphragm adjustment skills. Regularly experimenting with different settings and observing their impact on the final image will significantly improve your microscopy skills. Through a keen understanding of light interaction with your specimen, you will be able to create stunning and scientifically accurate microscopic images.
Latest Posts
Latest Posts
-
3164 Divided By 45 With Remainder
Mar 19, 2025
-
How Much Is 30 Of 300
Mar 19, 2025
-
What Is 7 25 As A Percent
Mar 19, 2025
-
Which Organ Stores And Compacts Waste Before It Is Eliminated
Mar 19, 2025
-
How Much Is 2 1 2 Cups
Mar 19, 2025
Related Post
Thank you for visiting our website which covers about What Is The Diaphragm On A Microscope . We hope the information provided has been useful to you. Feel free to contact us if you have any questions or need further assistance. See you next time and don't miss to bookmark.
