What Does The Diaphragm Do Microscope
Kalali
Mar 11, 2025 · 6 min read
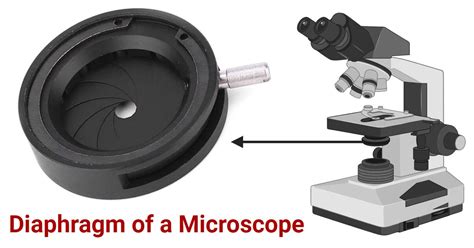
Table of Contents
What Does the Diaphragm Do on a Microscope? Mastering Illumination for Optimal Viewing
The microscope, a cornerstone of scientific discovery, allows us to explore the intricate details of the microscopic world. While the objective lens and eyepiece are often the focal points of discussion, the diaphragm plays a crucial, often underestimated, role in achieving optimal image quality. Understanding its function is paramount for anyone seeking to master the art of microscopy. This comprehensive guide will delve deep into the diaphragm's purpose, exploring its impact on image clarity, contrast, and overall viewing experience.
Understanding the Diaphragm's Role in Illumination Control
The diaphragm in a microscope, typically located beneath the stage, acts as a critical component of the illumination system. It's not simply a light dimmer; instead, it meticulously controls the amount of light reaching the specimen. This control is achieved by adjusting the size of the aperture, effectively regulating the cone of light that illuminates the sample. Think of it as an iris in your eye – adjusting to regulate the amount of light entering.
The Iris Diaphragm: Precision Illumination Control
Most microscopes utilize an iris diaphragm, a sophisticated mechanism consisting of overlapping metal leaves. These leaves can be precisely adjusted, creating a circular opening of varying diameters. This allows for incredibly fine control over illumination intensity. The smaller the aperture, the less light passes through.
The Importance of Proper Illumination
The quality of your microscopic image is intrinsically linked to proper illumination. Insufficient light results in a dim, hard-to-interpret image. Excessive light, on the other hand, can lead to glare, washout, and a loss of contrast, obscuring fine details. The diaphragm's role is to achieve the Goldilocks effect: just the right amount of light for optimal viewing.
How the Diaphragm Impacts Image Contrast and Resolution
The diaphragm's influence extends far beyond simple brightness control. It directly affects two crucial aspects of image quality: contrast and resolution.
Enhancing Contrast: The Key to Visibility
Contrast, the difference in light intensity between adjacent areas of the image, is essential for distinguishing structures and features within the specimen. Proper diaphragm adjustment plays a crucial role in optimizing contrast. By adjusting the aperture, you can manage the angle of light striking the specimen. A partially closed diaphragm typically increases contrast by reducing scattered light, making structures stand out more clearly. This is particularly important when viewing transparent specimens where subtle differences in refractive index are critical to differentiate structures.
Resolution and the Diffraction Limit
Resolution refers to the microscope's ability to distinguish between two closely spaced points as separate entities. While the objective lens primarily determines resolution, the diaphragm plays a supporting role. An optimally adjusted diaphragm maximizes the resolution achievable by the objective lens. A completely open diaphragm can lead to a loss of resolution due to excessive light scattering and diffraction. A slightly closed diaphragm helps to manage this scattering, thereby improving resolution, especially at higher magnifications.
Diaphragm Adjustment: A Step-by-Step Guide
The process of adjusting the diaphragm is intuitive but requires practice to master. The optimal setting varies depending on the specimen, magnification, and type of microscope.
1. Start with a Partially Closed Diaphragm
Don't begin with the diaphragm fully open. Start by partially closing it, providing a controlled level of illumination.
2. Observe the Image Carefully
As you adjust the diaphragm, closely observe the image on the eyepiece. Note the changes in brightness, contrast, and resolution.
3. Fine-Tune for Optimal Results
Gradually adjust the diaphragm, opening or closing it slightly until the image exhibits optimal contrast and detail. Avoid extreme settings, which can negatively impact image quality.
4. Experimentation is Key
The best setting is often subjective and depends on various factors. Don't hesitate to experiment and find the sweet spot that delivers the clearest and most detailed image for your specific specimen.
Types of Diaphragms in Microscopes
While the iris diaphragm is the most common type, other diaphragm designs exist:
Field Diaphragm
Located at the base of the condenser, this diaphragm controls the illumination field, limiting the size of the illuminated area on the specimen. It's primarily used to prevent stray light from affecting the image. While not directly influencing contrast in the same way as the aperture diaphragm, its proper adjustment improves the overall quality of the image.
Aperture Diaphragm vs. Field Diaphragm: A Crucial Distinction
The two diaphragms work in concert. The field diaphragm controls the illuminated area, while the aperture diaphragm regulates the light entering that illuminated area. Correct adjustments to both are essential for optimal microscopy.
Troubleshooting Common Issues Related to Diaphragm Adjustment
Sometimes, even with proper adjustment, image quality may suffer. Here are some common issues:
1. Poor Contrast: Too Much Light
If the image appears washed-out and lacks contrast, the diaphragm may be too open. Try closing it gradually until the contrast improves.
2. Poor Resolution: Diffraction Effects
If the image appears blurry or lacks detail, the diaphragm might be either too open, leading to diffraction effects, or too closed, restricting necessary light. Experiment with slight adjustments to find the optimum setting.
3. Inconsistent Illumination: Misalignment
Inconsistent illumination might be due to misalignment of the condenser or light source. Ensure that the condenser is properly aligned and centered.
4. Dirty Condenser or Diaphragm
Dust or debris on the condenser lenses or diaphragm can significantly impact image quality. Clean these components regularly using appropriate cleaning materials.
Beyond the Basics: Advanced Diaphragm Techniques
For advanced microscopy techniques, a more nuanced understanding of diaphragm adjustment is required.
Köhler Illumination: Optimizing Illumination for Professional Microscopy
Köhler illumination is a crucial technique for achieving uniform, high-quality illumination. It involves aligning the light source, condenser, and field diaphragm to ensure even illumination across the entire field of view. Mastering Köhler illumination significantly enhances image quality and minimizes artifacts.
Darkfield Microscopy: Harnessing Scattered Light
In darkfield microscopy, the diaphragm is used to prevent direct light from reaching the specimen. Only scattered light from the specimen reaches the objective lens, making it appear bright against a dark background. This technique is particularly useful for viewing transparent specimens that would otherwise be invisible under brightfield illumination.
Phase-Contrast Microscopy: Enhancing Contrast in Transparent Specimens
Phase-contrast microscopy employs special optical components to enhance contrast in transparent specimens. The diaphragm's adjustment plays a role in optimizing the phase contrast effect, allowing for the visualization of fine details within transparent cells and structures.
Conclusion: Mastering the Art of Diaphragm Adjustment
The diaphragm, though often overlooked, is a crucial component of the microscope. Understanding its function and mastering its adjustment is essential for achieving optimal image quality. By carefully controlling illumination, you can enhance contrast, improve resolution, and unlock the full potential of your microscope. Through practice and experimentation, you'll refine your skills and consistently capture clear, detailed images of the microscopic world. Remember the interplay between the aperture and field diaphragms; mastering both ensures a complete command over illumination. This detailed understanding empowers you to tackle various microscopy techniques effectively and unlocks new vistas of observation. So, explore, experiment, and refine your approach – the microscopic world awaits your discovery!
Latest Posts
Latest Posts
-
Common Multiples Of 4 And 9
Mar 11, 2025
-
1 1 4 In To Mm
Mar 11, 2025
-
Does Hydrogen Have More Electrons Than Uranium
Mar 11, 2025
-
How Many Valence Electrons Are In Potassium
Mar 11, 2025
-
1 1 2 In To Mm
Mar 11, 2025
Related Post
Thank you for visiting our website which covers about What Does The Diaphragm Do Microscope . We hope the information provided has been useful to you. Feel free to contact us if you have any questions or need further assistance. See you next time and don't miss to bookmark.
